Working with Heatshrink Tubing
Terminating Your Project With Heatshrink Tubing
Heatshrink tubing is the ideal way to create a tight, professional finish on any wire, hose or cable management project. Once shrunk, the tubing will hold its reduced state, even an elevated temperatures. Heatshrink terminations are tight and smooth, and the tubing will generally conform to fit around plugs or connectors. The wide range of available sizes, colors and product grades make heatshrink tubing a versatile, economical and easy solution for any termination application.
What does shrink ratio (2:1, 3:1, etc.) mean?
The shrink ratio is the approximate maximum amount that heatshrink tubing will shrink relative to the unshrunk diameter. For example, a piece of 3/4" heatshrink tubing with a 3:1 shrink ratio will shrink down to a maximum diameter of approximately 1/4" when fully shrunk. All heatshrink tubing on WireCare is specified in it's UNSHRUNK diameter, so consider the shrink ratio and the unshrunk diameter when ordering heatshrink tubing. Heatshrink tubing with a larger shrink ratio will be more forgiving when fitting the tubing over plugs or connectors, but will have a bit thicker wall thickness and slightly less flexibility when shrunk then a lower ratio product.
Be sure to check out our great selection of heat guns for finishing your heatshrink tubing installation.

Measuring Your Tubing
Measure the heatshrink tubing to length and cut with a scissor. The thickness of your bundle, as well as the desired final appearance, will determine the length of the tubing you cut. Generally, a piece 1 1/2" - 2" long will accommodate almost any need (such as this bundle of 10 CAT-5 network cables). Single wires or smaller bundles will require shorter pieces.
Positioning The Tubing
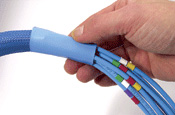
Slip the tubing over the bundle and position it so that both the sleeved and unsleeved portions are sufficiently covered. Notice the small pieces of tubing installed on single wires as part of a color coding system. If your project requires multiple operations, always work up from the smallest to the largest bundle.

Finishing The Installation
Gently apply heat from a heat gun, hair dryer or torch with an appropriate diffusion attachment. Keep the heat source far enough away so that hot metal or direct flame doesn't come in contact with the tubing, wires or sleeving. Move the heat around the bundle to prevent damaging the sleeving and to ensure that all areas of the tubing have been shrunk to their limits. Be patient and work slowly. Once cooled, your installation is complete.


